Showing posts with label crafts. Show all posts

Sunday, August 17, 2014

Promoting Creativity through Arts and Crafts


When our family initially started homeschooling and developed our philosophy of education, we decided that creativity was a trait that was important to us and one that we wanted to develop in our children.  According to one of my favorite books about creativity, one of  the best gifts we could give our children is to provide them with ready-materials and time.  It’s important to let them invent, create, and have fun.  It sure makes a mess, but it’s worth it!  Arts and crafts projects that don’t use pre-drawn patterns or designs allow children to create and develop according to their view of the world.  Here are some ideas for some of the craft projects we did:

  • Paper mache’ — create sculptures or scenes using newspaper and flour & water glue.  After it dries, paint with Tempra paints and add twigs, stones, dried moss, aluminum foil or mirror rivers and lakes, etc.  Great fun!  We once created the Garden of Eden doing this.
  • Sawdust and glue — similar to paper mache’ but using fine sawdust and Elmer’s glue instead.
  • Make kites — use a plain template and paint or color designs on the kite body to make your own design or check online or the library for books and kite shapes.
  • Wooden objects — children seem to enjoy crafting with wood, so we bought lots of different ‘wood’ things from the craft store and let them paint, decorate, hammer, nail, etc. to make things.  Stencils are helpful in adding designs like planes, trains, etc.  When homes were being built around the neighborhood, we would ask the contractor if we could take the wood scraps home.  They were happy to get rid of them and they provided raw materials for some great homeschool building projects.
  • 3-D art using foam shapes, twigs, dried legumes, etc.  Fun to use a basic design on tag board and then glue objects on it to make a collage or work of art
  • Computer art — using simple programs that teach 3D animation, computer graphics, or photo editing.
  • Kits — lots of fun!  Go to Michael’s or Craft Warehouse and look at all the kits that are available.  Latch hook rugs, felt art, beading, etc. can all be fun for both girls and boys.  Boys enjoy making latch hook rugs in an airplane theme!
  • Candle-making — either dipped candles, molded candles or rolled candles using beeswax.  Kids especially have fun with this project:   take an aluminum pie plate and hold a regular candle up in the middle of the plate.  Then pour melted, colored wax into the plate.  Gently dip the plate of wax in a sink full of cold water.  The hot wax will rise to the top and will ‘hug’ the candle, making a candle holder.  Work as a team, as hot wax can burn.
  • String art — look online for designs.  A pattern looks somewhat like a dot to dot page, but without the numbers.  Colored string is sewn on the page in sequences that create a woven effect and make beautiful pictures — of ships or buildings — etc.
  • Watercolor — really fun and helpful if you can find someone who is willing to give a few lessons first.  Use ‘cheater’ techniques to help get started with watercolor (like dot stickers that keep paint from sticking somewhere when you first coat the page, etc.).  Small paintings make great Christmas gifts for family.
  • Sewing. Boys love sewing machines!  And so do girls.  Make them earn their driver’s license first (to teach machine safety) and then give them small projects where they create designs — hot pads, pillows, and other small things are fun.  Or, have them turn a t-shirt inside out and sew up the neckline and the sleeves.  Turn right-side-out and stuff will pillow stuffing.  Then stitch up the bottom. Sewing designs on paper is a good way to develop fine motor skills.
  • Theme quilts — have them make quilt blocks on a theme (we made one with a dog theme and another with an airplane theme).  Use muslin for the blocks and cut them out in 10″ squares.  Using fabric crayons, permanent markers, appliques, buttons, or photo transfers (where you print off photos onto transfer paper and then iron them onto fabric) to create blocks in the selected theme.  Give grandma a block to make — and one to dad — and one for mom — etc.   Then have the child sew the blocks together with printed fabric (also in their theme — they have fun going to the fabric store and choosing something that strikes their fancy).  The quilt top is pretty easy to make.  Add a back (stitch together like a pillow case with thin, rolled padding for the middle and then turn right side out).  Tie with yarn and stitch up the turn-space by hand.  Easy and really valued by the child when done!
  • Flower and weed arrangements. Make wicker and twig (or silk flower or dried leaf) arrangements or wall hangings.  Cool glue guns, fabric ribbons (printed in themes kids like) etc. all work together to make small objects, arrangements, wall-hangings, etc.  The fun is the process — and they make nice gifts for family members.
  • Ceramics. We had a great time with ceramics!   A ceramics shop has green-ware that they will show you/your child how to clean (using tools kind of like a dentist uses).  After it’s cleaned, they will bake it for you in a kiln for a small fee.  Then have child apply a glaze and take it back to the ceramics shop to be processed in the kiln again.  We chose projects like gazing balls, vases with multi-colored glazes that melted and make funny patterns, chess game pieces, etc.  You can also get plain clay from them — like play-dough.  Statues, objects, free-form pots, etc. can all be made.  When done and dried they can be fired and glazed as well.
  • Model rockets and model airplanes — plastic or paper — ones that fly or are used just for decoration — all are fun and teach creativity and following directions.  Allow your child to think ‘outside the box’ as they create on their own using the base kits that are available at craft stores.
  • Model airplane paints work great for painting designs on stones for paper weights.  Be sure to buy the type of paint that is safe to breathe!
  • Legos. For art — never negate the value of Legos when it comes to developing creativity!  So many skills are learned with Lego building.  You might assign specific projects with Legos — a complete village or building or vehicle.  Take a picture of the finished project to remember it by.
  • Photography. Art principles can be taught and artistic skills developed using photography as the vehicle. In addition to taking pictures, students can start a photography blog where they post their photos. Photography can easily be used to teach "across the curriculum". Nature study, composition and writing, art principles, and human relationships are just a few subjects that can be incorporated into photo studies.

Happy creating!  Children are only limited by time, resources, and their imaginations!

Saturday, February 2, 2013

Flubber Fun!


Cabin fever can hit the homeschool family in January. It's a time when family pets and parents feel like nesting in front of a cozy fire! But kids don't usually feel that way. With so much energy, it's a good time to measure and mix in the kitchen. Math skills can be developed while creating recipes for creative and fun play.

Flubber Fun


1 cup Elmer's white glue

1 1/3 cup warm water
food coloring
2 tsp. Borax
2 glass bowls

In one bowl, mix the glue, 2/3 cup warm water, and food coloring together. In the other bowl, mix the Borax with the remaining 2/3 cup warm water. Pour the glue solution into the bowl containing the Borax mixture. Stir until mixed. Then, let mixture rest so that the stretchy flubber can set. 


Enjoy hours of creative fun with your kids!


Saturday, September 22, 2012

Autumn Leaf Craft


When the boys were young, we spent much time creating. One room was reserved for messy projects like painting, cutting, pasting. Sometimes other media were used like wax, cardboard, string, balloons, newspapers, glitter, and more. What fun we had! This was always an integral part of our home school.

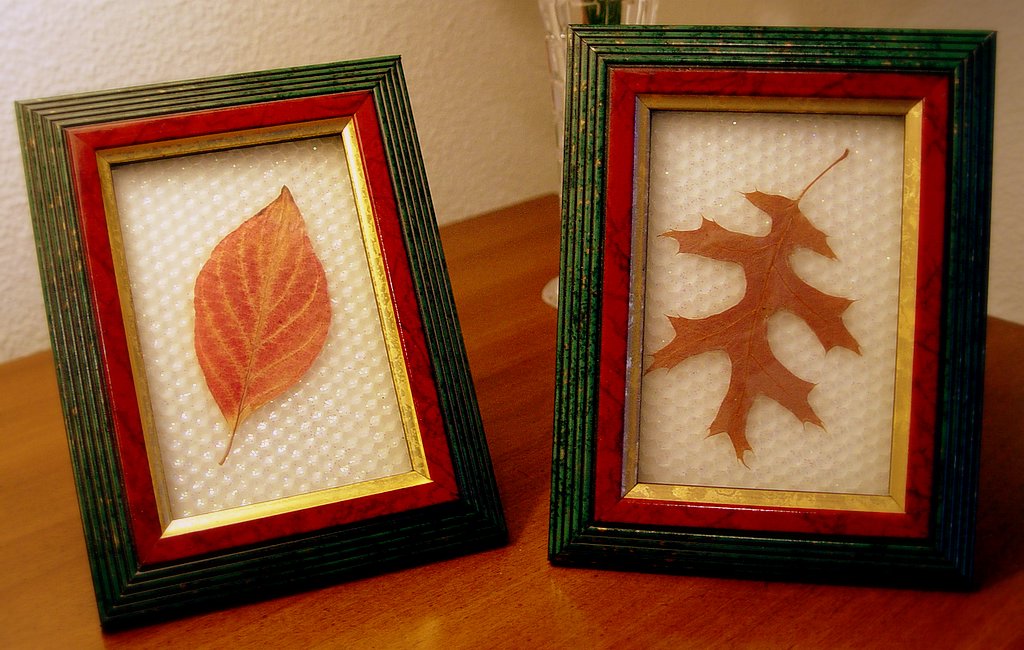
Last week when we visited Dad and Alma, one of the boys early projects was sitting on the nightstand in the guest room. So simple, yet sweet, these leaf art pictures have graced the guest room for nearly 10 years now. 

If there are young children in your family, this is a great project to do with them! Here's how:

  • Purchase small frames. They do not need to be expensive. Frames from a place like the Dollar Store or WalMart work perfectly. Remove the colored 'advertising' in the frame. In it's place, insert a piece of plain white paper.
  • At the craft store, purchase a sheet of beeswax. With sharp scissors, cut it to the same size as the 'advertising' paper you removed from the frame. Place the beeswax on top of the plain white paper.
  • Sprinkle extra fine "prisma" glitter sparsely on the beeswax.
  • Place one dried leaf per sheet of beeswax. Center it carefully, so that it looks like it's falling from a tree.
  • Put the frame together, with the glass layer going on top of the leaf and beeswax. Secure tightly and enjoy.

*This project also works well with dried flowers.

Monday, June 6, 2011

CrEAtiViTY Found in Nature


As homeschool parents, we generally think of nature study as a way to learn about science, or to learn about God through it, His second book.  Sometimes we view time in nature as a means for recreation and physical activity.  But this time can also provide impetus for creativity!  Nature study can produce creative results, stimulates creativity, and refreshes ideas.  It becomes a means of creating and achieving artistic expression.  Nature as a means of creative expression requires time that is spent in quietness and observation.  It is a time that happens without motors and gadgets.  A good pair of walking shoes, binoculars, a sketch pad and pencil, a bottle of water, and a small backpack to carry things in are the only resources needed.  Hiking through fields and meadows, climbing mountain trails, observing on the ocean shore, and meandering along a stream or river provide opportunity to gather, collect, and observe.  The process brings refreshment to the tired and weary, eliminating the stresses of daily life.  Even children find respite from daily stress as they spend time in nature.


How does nature observation provide a means to creativity?  It stimulates creativity in many ways.

*Nature contains every color palette ever created.  Complimentary,
analogous, and monochromatic color schemes can all be found with a
little effort and an impromptu treasure hunt.

* Nature provides a plethora of ideas for creative writing.  Subjects
can be found for story, verse, or poem simply by looking around.

* Nature shows variable subjects for sketching and watercolor.

* Nature presents objects for sculpture.  A collection of rocks,
twigs, dried plants, and sand can be glued together to make
magnificent displays.

* Nature brings many things that work together to create a centerpiece
or focal point for a space indoors.  Twigs, rocks, moss, and flowers
can create whimsical scenes on the kitchen table.

*  Nature is a perfect place to practice photography.  Waiting quietly
for a bird or animal to come near, or staging a scene, give the
participant quiet time in nature as creative abilities are enhanced.


The opportunities nature provides are endless!  Children can gather rocks, leaves, flowers, bark, and sand.  Or they can search for feathers, arrowheads, egg shells, and nests.  They can draw what they see.  They can tell about their observations by writing in a journal.  When they "glass" what they see with binoculars or scope their perspective changes.  Children can build forts or blinds.  They can observe wild animals, birds, tadpoles, frogs, salamanders, and snakes.  They can picnic on a point, or build sandcastles on the beach.  They  can sleep in a tent in the woods, or hike trails and post markers along the way.  Every experience in nature replenishes the soul and stimulates the creative aspects of the brain.


God created a universe that is personal, alive, vibrant, and ever changing.  As we experience it with our children, we reinforce appreciation for Earth and the creativity it fosters in each being who takes the time to notice it.  Through experiences in nature our children gain a better understanding of an infinite God as He speaks to the soul.

Friday, May 6, 2011

Gifts for Mothers by Kids!


Holidays are special events and create opportunities for homeschool children to create!  Thoughtfulness is taught by example and practice.  Service to others starts with doing simple things at home.  Ideas do not need to be complicated or difficult.  It is the small things in life that combine and build upon each other to create a multitude of blessings!  


Mother's Day is near.  It might not be possible for every child to take their mother out for a Mother's Day Brunch or to give her breakfast in bed, but there are other things they can do to show their love and appreciation to their mom.


Here are a few quick and easy ideas for making thoughtful gifts for the "mothers" in your child's life.  These are easy enough they can make one for mom, grandma, aunties, and neighbor moms who interface with them.  It's not too late to have them ready by this Sunday's Mother's Day!

This is a "Gift in a Jar" idea called Painted Desert Chili.  All the ingredients are layered into a quart jar, just like sand art.  The layers don't need to be flat, as the desert effect comes from a rippled appearance created by each ingredient as it is layered in.  Be sure to add the seasonings carefully along the edges of the jar so they can be seen.  Then fill the middle of the layer.  This way all the beautiful layers show on the outside of the jar.

Painted Desert Chili

Layer each ingredient in the amount and order given in a quart jar:
 

1/4 cup dried parsley
2 Tablespoons granulated garlic
2 Tablespoons taco seasoning
2 Tablespoons dried onion flakes
2 Tablespoons taco seasoning
2 Tablespoons cumin
2 Tablespoons paprika
2 Tablespoons white cornmeal
2 Tablespoons taco seasoning
2 Tablespoons granulated garlic
2 Tablespoons chili powder
2 Tablespoons dried parsley
1 cup dried pinto beans
1/4 cup small dried white beans
1/4 cup small dried black beans
Approximately 1 cup dried kidney beans

Attach these directions:


Pour contents of jar into 12-quart pot. Add:


1 medium diced onion

4 15-ounce cans diced tomatoes
1 large can of tomato paste
1/2 cup cider vinegar
1/2cup brown sugar
49 ounces tomato juice
2 cups textured vegetable protein, re-hydrated

Fill remainder of the pot with water. Bring to boil, simmer for 2 and a half to 3 hours. Add salt to taste.


Add a color circle of fabric to the top of the lidded jar and tie with ribbon or raffia.  


This is a gift bag idea called You are a Blessing to Me Mix.  These little gift bags present a message of hope and gratefulness to the receiver.  Each ingredient represents a blessing.  The child who prepares the mix chooses what blessing to assign to each ingredient.  A blessing "key" is written on a tag to be attached to the gift bag before it is given away.  This recipe makes about 16 blessing mix gift bags containing about one-third cup each.  Use a cellophane goodie bag or zip-lock bags to package the blessing mix.  Then wrap in a circle or square of calico and tie with ribbon or raffia.  Attach tag with words of appreciation and a key to the blessing the child has chosen to apply to the ingredient.


You are a Blessing to Me Mix

2 cups Bugles brand corn snacks
2 cups small pretzels
1 cup candy corn
1 cup dried fruit bits or raisins
1 cup peanuts or sunflower seeds
1 cup M&Ms brand chocolate candy

16 Hershey's brand chocolate kisses

In a large bowl, gently mix all ingredients except Hershey's Kisses. Place 1/3 to 1/2 cup mix in small cellophane treat bags. Add one Hershey's Kiss to each bag. Close bag.


Create a hand-written or typed tag.  Cut out tags and attach one to each bag.


Enjoy!  And be blessed!

Tuesday, February 15, 2011

Painting with Puff!


When I was a child, my first grade reading book was Dick and Jane and they had a dog named Spot and a cat named Puff.  I always thought Puff was a cute name for a cat!  But this post isn’t about reading or about cats.  It’s about a fun art project that uses ingredients mixed together that creat a paint that puffs up when microwaved.  How fun is that?  Here’s the recipe.  May it keep your children happily entertained for at least an hour or two!


In a small bowl, combine:

2 Tbsp. self-raising flour
6 drops of food coloring
2 Tbsp. salt

Add enough water to make into a creamy paste.  Using a paint brush or sponge, create a design on tagboard or cardboard.  Make another ‘batch’ of puffy paint in other colors if desired.  Paint, paint, paint.  When done, microwave the design on high for  15 – 30 seconds.  The paint will puff and should dry completely.


*To make your own self-raising flour, blend 2 cups of all-purpose flour with 1 Tbsp. baking powder.

Saturday, January 1, 2011

A Crayon Apron

Did you ever have a crayon apron?  They were popular in the 60's as a sweet apron for children.  My mother made one for me and one for my sister.  I remember how special we felt wearing our very utilitarian, yet very pretty aprons.  There was a narrow pocket for each crayon in our coloring set.  A larger pocket would hold a notepad, scissors, a roll of tape, and some paste for gluing.  Sister and I would fill our pockets and then spend hours creating art projects or pretending we were school teachers.  The apron show in these pictures are not of our aprons, but rather of a vintage one I purchased recently.  Mother made ours out of a tiny floral print.  If there was any embellishment, it would have been embroidery or something done in fabric paints.  I was excited to find this vintage children’s crayon apron.  It’s exactly the same design as the one Mother made for me, just in different fabrics.  This was truly an apron that inspired imagination!  They are easy to make, fun to wear, and inspire creativity in children.  No pattern is needed, just invent as you go and have fun.  Your kids will thank you!  Better yet, let them help you!